You are eager to get that organizer created and feel that you should already know how to do it. This is natural. You think "When I run into a problem, that's when I will read or learn the instructions". This works, but often you miss out on things because you are not even aware that they exist. As a result things can look difficult when you want to do something different.
Spend some minutes understanding the basics and this will SAVE YOU TIME and even spare you some pain.
There are just a few things to know, and then "LET THE ADVENTURE BEGIN".
1. Tabs

TOOLBAR: This tab opens up the main toolbar which allows you to create Organizer elements and more.
CONTENT: This tab allows you to find the published content created by your students as well as all the published content that exists in MY HERO.
IMAGES: This tab allows you to find and add images to your organizer.
ARRANGE: This tab presents the content of the organizer as a list. You can change the sequence of items in the list.
SNAPSHOT: This tab will result in a snapshot being taken of your organizer/workspace/collaborative organizer. You can fall back to the snapshot, if needed. A snapshot allows you to make changes and if you don't like what you did, restore the snapshot.
CREATE: This tab allows yo to create a new organizer.
SELECT: This tab allows you to locate one of your organizers as well as see what organizers are in-progress as well as published.
EDIT: This tab is active when an organizer page is being built or is being edited.
WORKSPACE: The workspace is an area where organizer elements can be saved and from which elements can be retrieved. For example, you have a story in Organizer A that you would like to include in Organizer B. When in Organizer A you can copy the story to the workspace. When you change to Organizer B, you can copy the story from the workspace into the organizer.
COLLABORATE: This allows you to create a collaborative version of your organizer that can be worked on by others who have permission to collaborate with you.
CLASSROOMS: This will show you the your classrooms, the students in each and what content has been created by your students.
2. Browser Back and Forward Buttons
If you are in the tab ORGANIZER EDIT and before that were in SELECTION, then pressing the 'browser back' button will return you to SELECTION. Pressing the 'browser forward' button will return you to ORGANIZER EDIT.
3. Main Toolbar Top and Bottom
Moving to the Top vertical_align_topor the Bottom vertical_align_bottomof the Edit Page using these options on the Main Toolbar.
 The Main Toolbar is located on the left of the screen. It is used to create organizer elements, to format the organizer, to view the organizer as well as publish the organizer.
On large screens the Main Toolbar is to the left of the organizer page. Its position can be changed by dragging. On smaller screens the position of the Main Toolbar is fixed in position on the left side of the organizer edit page. To hide the Main Toolbar, click the close (X) icon on the top right of the toolbar. The toolbar can be shown again by clicking the menu icon menu located on the left of the tab bar, or located on the top right of the Item Toolbar.
 The Item Toolbar is located on the right of the screen. It is used to select or format selected items on the organizer page. For example, by selecting an image item for example, the alignment of the image can be changed. It can also be selected for moving. Depending on the item, different formatting options are presented.
On large screens the Item Toolbar is to the right of the organizer page. Its position can be changed by dragging. On smaller screens the position of the Item Toolbar is fixed in position on the right side of the organizer edit page. To hide the Item Toolbar, click the close (X) icon on the top left of the toolbar. The toolbar can be shown again by right clicking element on the organizer page, or by clicking on an item's mini-toolbar selection icon edit_location
Mini Toolbar

Above each element on the organizer page there is a mini-toolbar.
This allows you to quickly perform actions on the element. Common icons are edit_location which allows you to open the Item Toolbar, edit which allows you to edit the element and remove_circlewhich allows you to delete the element. Depending on the type of element more options are shown.
Right clicking your mouse on a page element (text box, story, image, divider) that is on the organizer page will normally open up the Item Toolbar that is displayed on the right hand side of the organizer page. This toolbar allows you to format or do other actions on the item you selected.
Left click and hold is used to drag an element on the organizer page to another location on the page. When letting go of the mouse button, the item dragged will be dropped at that location on the page. On wide screens, both the Main Toolbar and the Item Toolbar can be dragged to another location on the screen.
Saving Your Work
Your work is automatically saved while you are working on your organizer.
It will also be available to you on multiple computer devices. This means you can work on your organizer at school or at home using different computers and can continue where you left off.
As you work on your organizer you probably want to know what it will look like after it has been published.
Whenever you want to see the finished look hit the PREVIEW DRAFT button on the Main Toolbar.

Media Content Layout
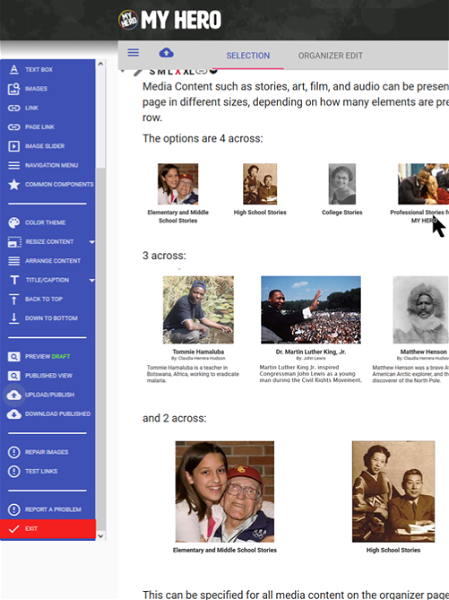
Media Content such as stories, art, film, and audio can be presented on the organizer page in different sizes, depending on how many elements are presented in a single row.
The options are 4 across:

3 across:

and 2 across:

This can be specified for all media content on the organizer page or it can be specified at the element level.
On the Main Toolbar, select RESIZE CONTENT and you will be presented with the choice of SMALL ( 4 across the page), MEDIUM ( 3 across the page) and LARGE ( 2 across the page.) 
If you want the size of a specific media element to be different, you can use the Item Toolbar,where you have the same options available. There is also an option called DEFAULT. Select this and the element will be sized according to what has been selected on the Main Toolbar.

Textboxes, Sliders, Images and Links can have several sizes. As a percent of the row size, these sizes are (25%) - S, (33%) - M, (50%) - L, (75%) - X and (100%) XL.
These sizes are shown in the Mini Toolbar displayed above these items.
Within these sizes, it is possible to reduce the size by the use of padding.
By selecting the Edit edit in the Mini Toolbar a Formatting Dialog Box will be shown that will allow you to change padding as well as other attributes of the element (such as title, image credit etc.)

Showing/Hiding/Editing Organizer Heading
This instructional Organizer has a heading called Organizer Basics. It also has a sub-heading.

It may not be desirable to show this heading. This can be controlled from the Main Toolbar using the TITLE/CAPTION option.

If the heading is showing on your page, there are two icons on the heading itself that you can use to either Edit the Headingeditor to Hide the Heading (X).
If you want to change how or where your elements are positioned on the page this can be done in a number of ways.
Some ways are easier than others and this depends on the how many elements you have on your page.
It also depends on whether you are using a mobile device or a touch screen device. On a touch screen device, drag and drop does not work and thus you will have to select the items you want to move and then indicate where you want them moved to.
1. reorder Using ARRANGE CONTENT on the Main Toolbar.
This opens up a separate screen where all of the elements on your page are presented as a list.

a) Drag and Drop. By left-clicking on the line title and then holding the mouse down, you can drag the line to another location in the list. You can then let go of the mouse once you have moved it to where you want it to go. This can only be done one line at a time.
b) Selecting one or more items with checkbox and then selecting the destination item using the Item Toolbox icon edit_location on the destination line. This opens the Item Toolbox. Under the heading (SELECT - MOVE/ADD FUNCTIONS) use the move Icon forward to execute the move. This is an easy way to move multiple items to another location.

After:

2. Drag and Drop on the edit Page.
When you click on an element on the edit page and hold down the mouse, and then start to drag the item the item you drag it over turns green. When you let go of the mouse, your element will positioned AFTER the element you dropped it on.
ADVANCED FEATURES OF ORGANIZER
Instructions on how to use the more advanced features of Organizer
Organizer created on 9/2/2019 1:42:50 PM by
Last edited 1/4/2021 5:22:20 PM by Anthony Pouw